
Kubernetes (K8s) is very neat pice of technology and de facto cloud-native standard now. It is cloud agnostic and can run on prem as well. I took a ACloudGuru course that focuses on Kubernetes and put together main points and concepts that are important to know when start working with K8s.
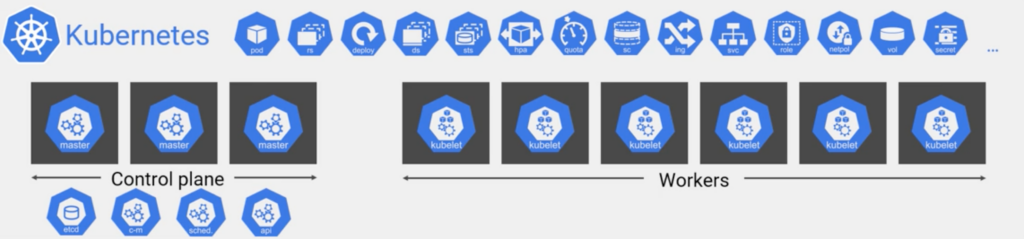
K8s is platform to run cloud native apps. Today cloud native apps are micro services that are usually part of bigger infrastructure. Inside of K8s is a bunch of Linux nodes for YAML and cloud instances, some of them form a control plane and the other worker nodes. Control plane is API server, scheduler and a bunch of controllers and a persistent storage (etc).
K8S API
K8s uses standard Rest API and it performs CRUD operations (GET, POST, PATCH, UPDATE, PUT, DELETE). Most operations with API will be via kubectl command. K8s way of managing apps is to define the various parts of those apps in YAML file. You post them to API server and this update desire state of the cluster. At the background control plane runs a ton of watch loops and constantly checking the current state of the cluster matches the current desired state. So generally YAML files are source of truth, basically you define your app in YAML file and you give it to K8s cluster and it deploys your apps. So currently K8s has many API groups, see below.
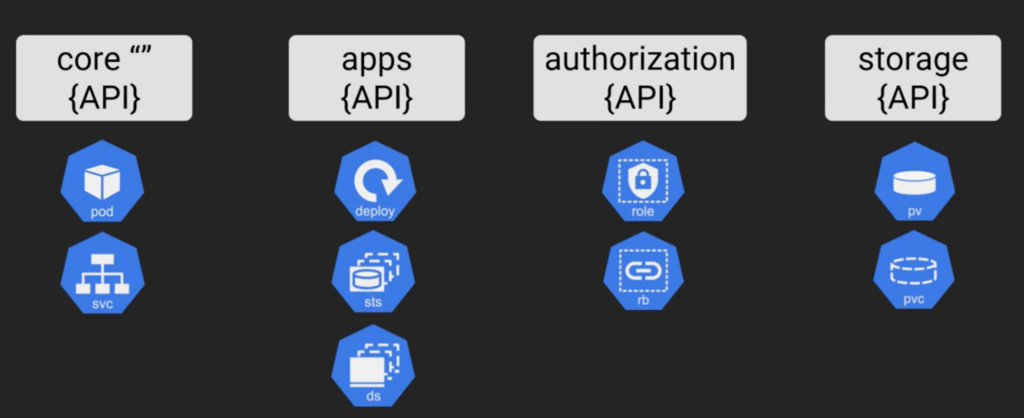
K8s API is massive and it’s constantly growing
K8s Objects
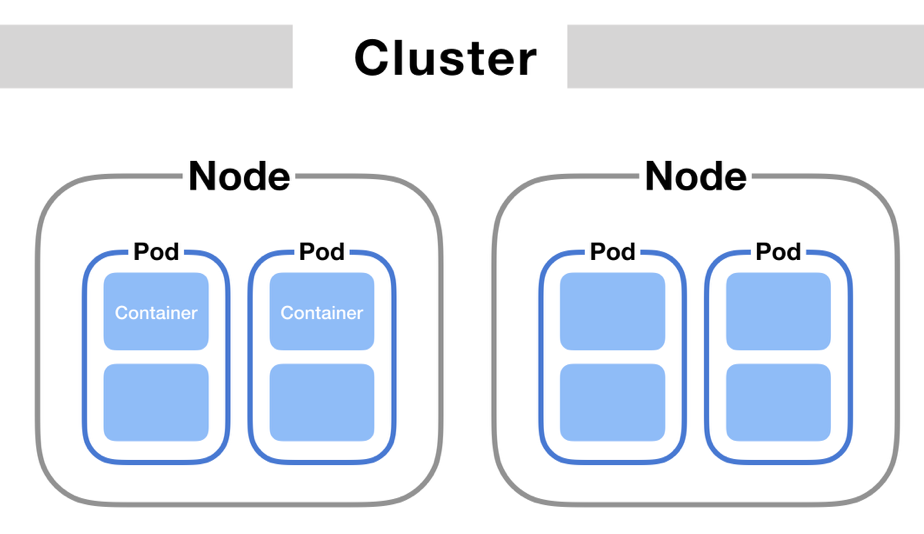
K8s cluster doesn’t run containers it wraps them in a high level construct called a pod and it is a atomic unit for K8s environment, but inside of each pod you can have one or more containers. The pod is an object on the cluster. The pods can be wrapped in a high level object called a deployment. And again it is an object on the cluster. Other objects exists for example Daemon that makes sure that only one of a specific pod will run on every worker in the cluster. Next there are stateful sets for pods and there are many more resources in the API that gets deployed on the cluster as objects. A pod always runs on a Node. A Node is a worker machine in K8s cluster and might be either a virtual or physical machine.
K8s App Architecture
Apps come from ideas and business requirements and we start sketching things out to decide what we need and then we do some coding. Once we done with coding we need to build some Docker images and we will be using in K8s pods. Next we mark each app components onto K8s object (deploy, service (load balancer), PVC storage object and so on) and write it all in declarative YAML file. So in general terms we describe our app requirements in K8s YAML and we use kubectl command to post YAML file to the API server.
K8s Networking
When we work with micro services each of them is a discrete network end point and has it is own IP and they all talk to each other all the time. In the cloud native world application are demanding that networks are dynamic and scalable and provide solid service discovery.
K8s lays down a few simple rules:
- All nodes in the cluster have to be able to talk to each other.
- All pods on the network can communicate with each other without NAT (Network Address Translation (can be a router) acts as a agent between the internet or public network and a local network or private network, which means that only a single IP is required to represent an entire group of computers to anything outside their network).
- Every pod gets it’s own ip address.
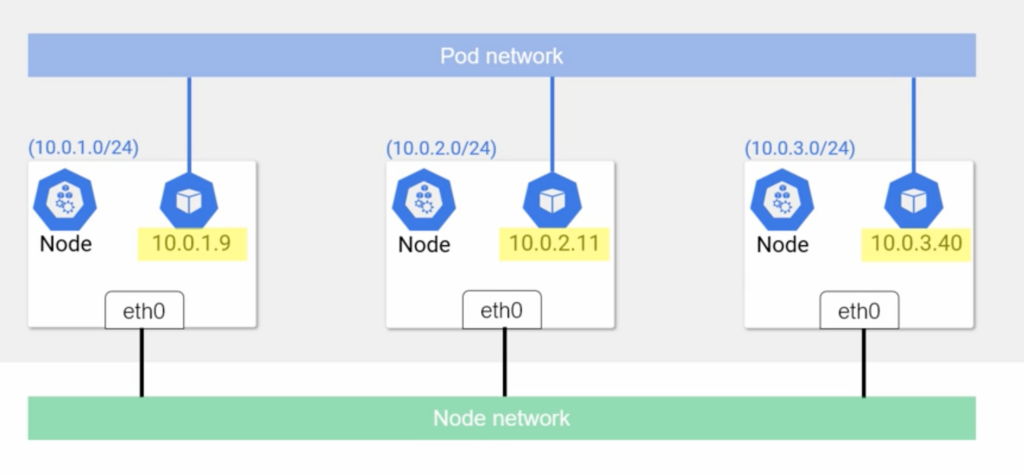
There are two types on network Pod network and Node network . The Pod network is big and flat and each node gets allocated a sub set of addresses, then as pods are spun up, they get scheduled to a particular node and the IP address they get is one from the range of addresses allocated to that node and these IPs also visible and reachable from all nodes and all pods.
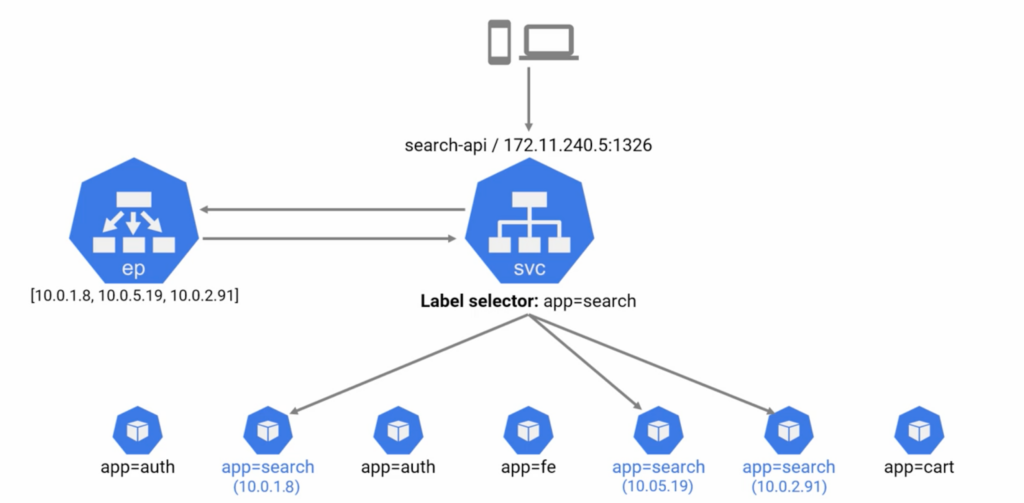
Generally pods talk to each other via Service (Stable network abstraction) that are put in front of pods. Each Service gets a name and an IP that are stable, they never changed for its entire life and it is guaranteed by K8s. Next name and IP get registered with cluster’s build-in DNS, so every K8s cluster has a native DNS Service and every pod in the cluster knows how to use it. So these Services can be considered as load balancers or proxies, but they need to know which pod send traffic onto we can do it with a label selector, so each pod has to have a label. In addition Service needs to know which Pod is alive and ready to accept connection, so when we create a Service object with a label selector K8s also creates another object on the cluster called an “endpoint object” and it creates a list of all Pods IPs and ports that match the Service’s label selector. The Service object is always watching the API server to see if new Pods that match its selector are being added or removed and automatically updates the list in the Endpoint object.
There are different types of Services (ClusterIP, NodePort, LoadBalancer) and they behave differently. ClusterIp is default Service it gets own IP and only accessible from within cluster. NodePort gets cluster-wide port, also accessible from outside of cluster.
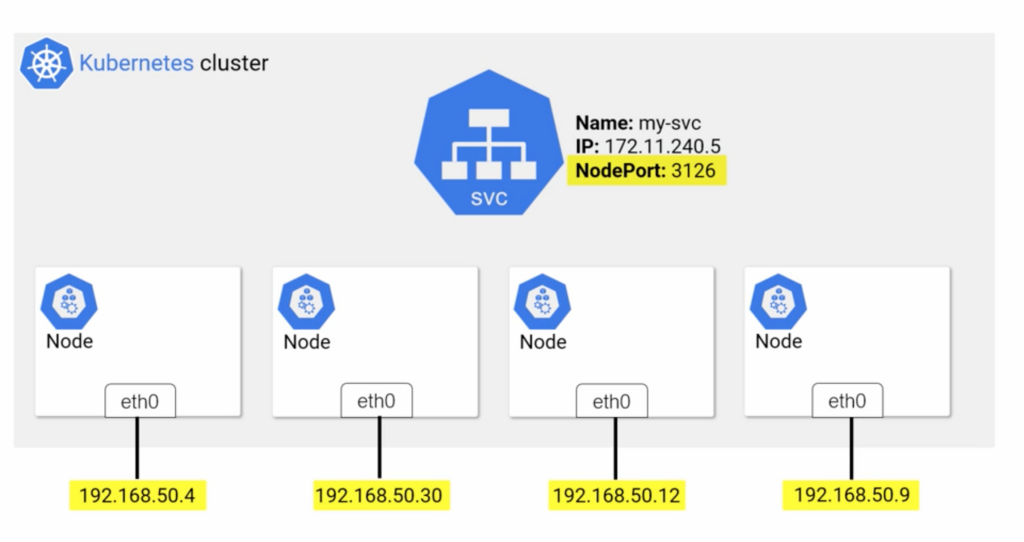
When we create a NodePort Service that generates semi-random port that when we append it to the IP of any nodes in the cluster allows connect to the Pods within each Node. The default range of ports that a NodePort value can come from ranges between 30000 and 32767 however you can change it with K8s API.
And the last type is Load Balancer, integrates with public and cloud platforms, and cloud provider handles creation of the Load Balancer.
When we create Service it doesn’t belong to Node or Pod network, it belongs to Service network. Traffic get to this layer from kube-proxy that is running on each node and has IPTables Rules or IPVS that creates dummy interfaces on the Service Network. There is how it works.
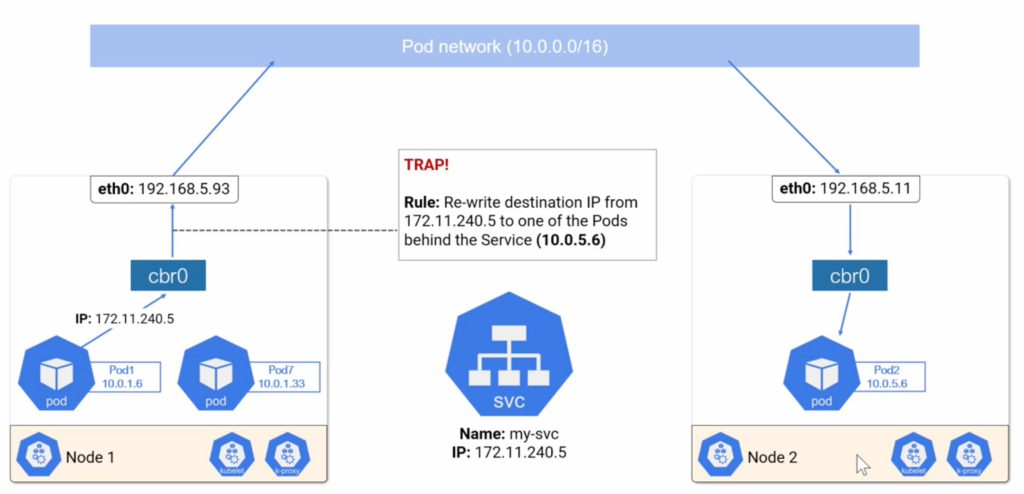
As you can see that Service IP is not on the Pod network or the Node network. The pod sends traffic to the Service and DNS directs it to Service IP so the pod then sends packets to its Virtual Ethernet Interface that has no idea about the Service network and the interface sends packets to its default gateway (CBR0-Linux Bridge) and it sends the packets up stream again this time to the nodes ETH0 interface and the packets get processed by the kernel on the host and when it happens kernel checks some IPVS or IPTables Rules and applies a rule anytime you see a packet for this address rewrite the destination address to one of the Pods behind the Service. It is better to use IPVS mode to implement this, since it can scale better than IPTables and it support more load-balancing algorithms.
Storage in Kubernetes
K8s volumes are all about decoupling storage from Pods. Pods use volumes to persistently store your data even after crashing or removing a Pod. Storage is a first-class citizen in K8s. Storage usually provided by cloud provider. K8s allows to connect to any storage provider.
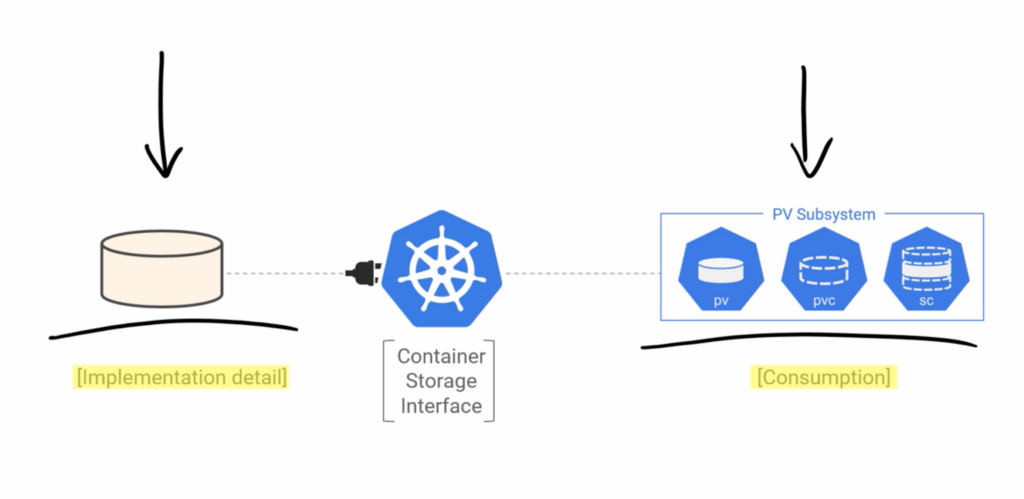
Consumption of data is done via PersistentVolume(PV), PersistentVolumeClaim(PVC), StorageClasses(SC). Storage classes allow data consumption in dynamic and scalable way.
Container Storage interface (CSI) – allows to plug to K8s from storage providers and use K8s persistent volumes. Storage is always exist independently like Node and Pod networks. PV is an object in the cluster and we create it with YAML file. PVC is like a token which will claim space in PV. Pods can access volumes in tree different model -ReadWriteOnce, ReadWriteMany, ReadOnlyMany. PV can only have one active PVC/AccessMode. Reclaim policy allows to delete or retain volumes. Remember you need to manifest PV and PVC via YAML files. So when you claim PVC you need following steps to match, accessModes, storageClassName, storage (equal or less). In order for a Pod to use a PV it needs PVC which is claim on the PV and mount storage into container and it is mostly manual job and to make it more dynamic like storage resizing you need Storage Classes (SC)
Storage Classes – like anything else storage class an Api resources and defined via YAML files. So the sequence is the following SC -> PVC which will create PV.
From Code to K8s
There is how it works you start with business requirements, you write your code and bundle it with all of its dependencies into a Docker image then you put it in a registry. Next we create a k8s object that references the image we just made. There are we have a few option we could put the container in a pod and it will work ok but we tend to wrap everything in a high level construct like a deployment, demon set or stateful set. For example after creating a Docker image we can roll a deployment phase and ask for 3 replicas. Deployments let you scale up and down with demand. Demon Sets get you a single pod on every node and Stateful Stas are about stateful components in your apps and they give you ordered pod creation.

K8s Deployments
We got our code put in the image and that image runs as a container in a Pod but hey don’t do anything for us on the scaling or application release fronts. As a result we need a deployment. Deployments are higher level object than pods. In facts the same way that pods wrap containers we could say that deployment wraps pods. They are all about calling and updates. Also there is another layer between pod and deploy called replica set. And replica set takes care of any of mechanics of scalling-related operations that the deployment kicks off.

We can’t put different pods on the same deployment. And when we update image in the container the Replica Set will handle it. The deployment creates a new Replica Set and this replica set starts incrementing pods with the desire version and decrementing old pods. Replica set allows self healing. So always deal with deployment never go directly to the replica set. Deployments know which pods in the cluster it will be managing by using labels.
Auto Scaling with K8s
When load increases on your app and different apps are sensitive ti different types of load. For one app, it might be CPU cycles for another, it might be open connections. Generally speaking dealing with increased load means adding more pod replicas. That is where the Horizontal Pod Autoscaler coms in. It increases the replica count in the deployment object and this updates the desire state on the cluster, watch loops in the control plane notice the change and a replica set creates more pods. But when the cluster is full and there aren’t any nodes with enough capacity to take these new pods then these pods are going into the pending state. After that every 10 seconds the Cluster Autoscaler is going to check the pending pods and if it is find some it is going to add more nodes to the cluster. Once new nodes are available those pending pods can be scheduled.
Horizontal Pod Autoscaler (HPA)
it is all about pods, checking metrics and pods state. So when demand goes up we scaling horizontally meaning adding more pads. You define HPA like any Services in K8s via API and tell it to what deployment to work on and it is one to one relationship. One HPA to one deployment. Next you set your target for example your CPU utilization, and you create pods with resources request. So the sequence the following the HPA knows when the scaling need to happen and it tells deployment to do it. After the deployment tells replica set to deploy more pods.
Cluster Autoscaler with K8s
When you build your cluster with auto scaler enabled you need to be sure that you use pods with resource request. When you schedule a new pod K8s looks up the resources the pod is requesting and sees if they are available. Cluster Autoscaler works on requested values not actual values like HPA. Always schedule pods with resource request to do proper scaling.